This is great when you are attempting to change the way that your ribbon is displayed, but what about when you are accidentally hiding the ribbon, or making it visible when you do not want it? This is due to a precariously located button at the top-right corner of the window, and it is a source of problems if it is accidentally mis-clicked. But when you are aware of the button and what it does, it is a quick adjustment to re-click it after a mistake and restore the ribbon to your desired type of visibility.
Quickly Change the Visibility of the Ribbon in Outlook 2013
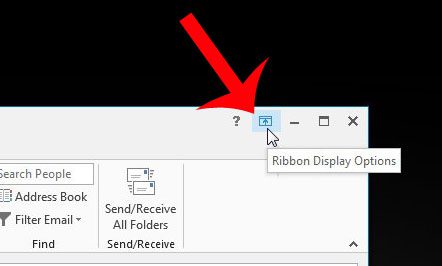
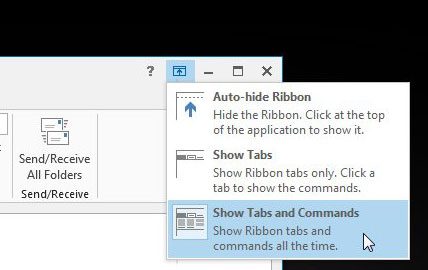
The steps in this article were performed in Outlook 2013. Methods for adjusting the ribbon visibility may be different in earlier versions of Outlook. Step 1: Open Outlook 2013. Step 2: Click the Ribbon Display Options button at the top-right corner of the window. Step 3: Select the way that you want to display the ribbon in Outlook 2013. The Auto-hide Ribbon option will hide the tabs and the ribbon, the Show Tabs option will only show the tabs, and the Show Tabs and Commands option will show the complete ribbon. You can read this article to find out about another way that you might be changing the visibility of the ribbon as well. if you are looking for additional help with Outlook 2013, then check out the Quick Start Guide from Microsoft.
See also
How to disable work offline in OutlookHow to strikethrough in OutlookHow to create a Vcard in OutlookHow to view the blocked sender list in OutlookHow to set up Gmail in Outlook
After receiving his Bachelor’s and Master’s degrees in Computer Science he spent several years working in IT management for small businesses. However, he now works full time writing content online and creating websites. His main writing topics include iPhones, Microsoft Office, Google Apps, Android, and Photoshop, but he has also written about many other tech topics as well. Read his full bio here.
You may opt out at any time. Read our Privacy Policy


