Creating an iPhone 5 Backup in iTunes
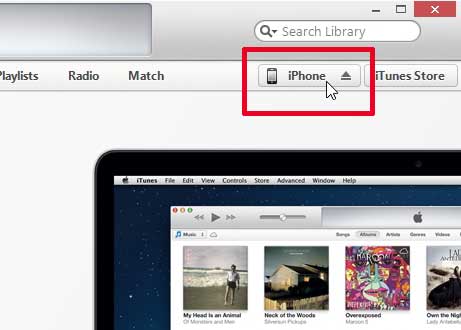
Note that this method is going to assume that you already have the most current version of iTunes installed on your computer. If you do not have iTunes on your computer, then you can download it from Apple here. Additionally, if you have iTunes configured to automatically sync your device whenever it is connected to your computer, then that sync will begin once you connect the iPhone to your computer. While your iPhone is syncing, the Back Up Now button will be grayed out. It will not be available until the sync has completed. With that in mind, grab your iPhone USB cable and follow the steps below to create a backup of your iPhone 5 in iTunes. Step 1: Connect the USB cable to the bottom of your iPhone 5, then connect the other end to a USB port on the computer on which iTunes is installed. iTunes should launch automatically but, if not, then you will also need to launch iTunes. Step 2: Click the iPhone device button at the upper-right corner of the iTunes window (the button highlighted below).
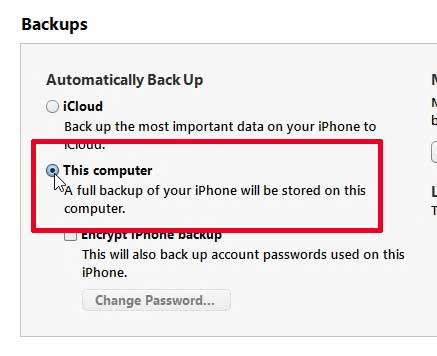
Step 3: Click the This computer option in the Backups section of the window. Note that you can use the iCloud option if you wish, but you may not have enough available space in your iCloud account if you have not purchased additional iCloud storage space.
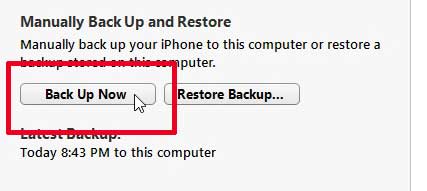
Step 4: Click the Back Up Now button and wait for the backup to complete.
Click here to see a full list of the information that is included in your backup. One of the easiest ways to back up the pictures on your iPhone 5 is to automatically upload them to Dropbox directly from your phone. Click here to learn how. After receiving his Bachelor’s and Master’s degrees in Computer Science he spent several years working in IT management for small businesses. However, he now works full time writing content online and creating websites. His main writing topics include iPhones, Microsoft Office, Google Apps, Android, and Photoshop, but he has also written about many other tech topics as well. Read his full bio here.
You may opt out at any time. Read our Privacy Policy


