Excel 2016 has a setting that allows you to adjust the print quality of your spreadsheets. If you are printing very large, multiple-page sheets, then a lower quality can save you some ink or toner and, ultimately, some money. Our guide below will show you how to adjust the print quality in Excel 2016.
How to Set the Print Quality for a Spreadsheet in Excel 2016
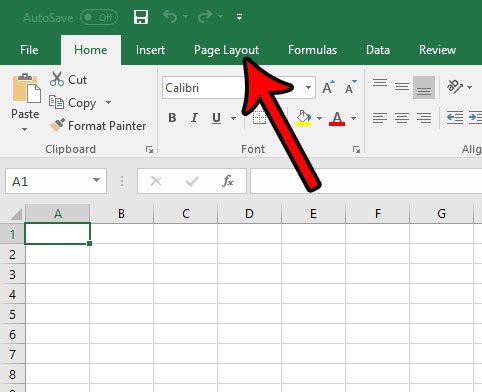
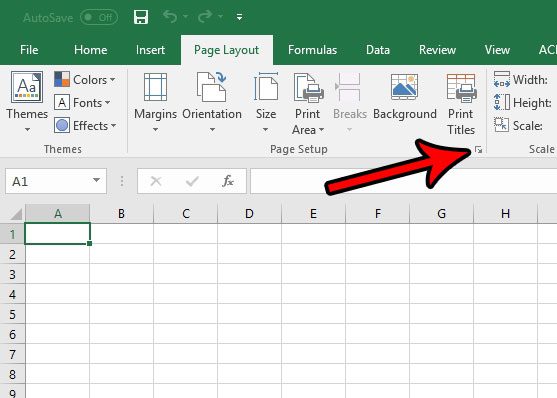
The steps in this article are going to change the quality of the spreadsheet when you print it. Lower quality will typically print faster and use less ink, but may not look as good. Depending upon your printing needs it can often be a good idea to start with a lower quality print setting and work up if needed. Step 1: Open your spreadsheet in Excel 2016. Step 2: Click the Page Layout tab at the top of the window. Step 3: Click the small Page Setup button in the Page Setup section of the ribbon. Step 4: Click the Print quality dropdown menu and select the level of print quality that you would like to use. You can then click the OK button at the bottom of the window to save the setting. Are you having difficulty getting your spreadsheet to print the way that you want? There are a number of variables that can affect printing in Excel, and it can be frustrating trying to find all of the options that let you do what you need to do. Read our Excel printing guide for some tips that can make printing a more pleasant experience. After receiving his Bachelor’s and Master’s degrees in Computer Science he spent several years working in IT management for small businesses. However, he now works full time writing content online and creating websites. His main writing topics include iPhones, Microsoft Office, Google Apps, Android, and Photoshop, but he has also written about many other tech topics as well. Read his full bio here.
You may opt out at any time. Read our Privacy Policy