Excel worksheets and workbooks can easily become very large, and a lot of the information that they contain might only be useful in specific situations. So when you are printing data that is meant to summarize the contents of a spreadsheet, it is helpful to omit extraneous data in an effort to simplify the print job and make it easier to read. We have previously written about how to set a print area in Excel 2010, which is helpful if you always need to print a specific set of data from a spreadsheet. But if you need to print different elements at different times, then a print area is not the best option. So continue reading below to learn how to only print your selection in Excel 2010.
Print a Selection in Excel
For additional information and pictures for each step, continue to the next section.
Print Selected Cells in Excel 2010
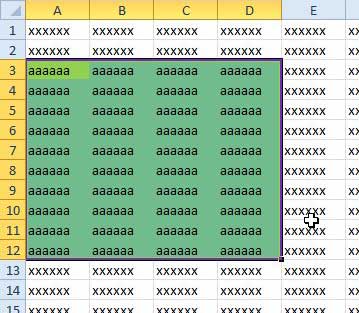
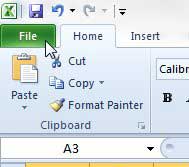
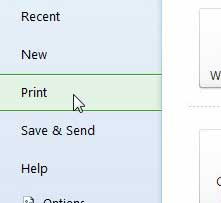
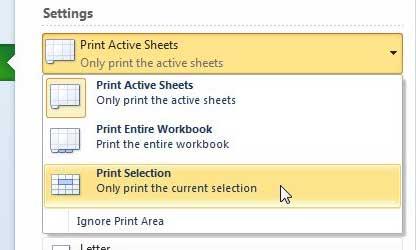
This tutorial is going to teach you how to print a specific set of cells in Excel 2010 that are defined by what you have currently selected. A selection in Excel is defined by the cells that are highlighted when you click your mouse on a cell and drag the mouse to select additional cells. With that knowledge in hand, you can elect to print only your selected cells. If you are looking for additional ways to customize your printed spreadsheets, then check out our guide to printing in Excel for some tips that can make it much easier. Step 1: Open your spreadsheet in Excel 2010. Step 2: Click your mouse on the first cell that you want to include in your selection, then drag the mouse to select the rest of the cells. Step 3: Click the File tab at the top-left corner of the window. Step 3: Click Print in the column at the left side of the window. Step 4: Click the Print Active Sheets button at the center of the window, then select the Print Selection option. Step 5: Click the Print button at the top of the window. If you print a lot of large documents on an inkjet printer, then you might be frustrated by the cost of ink and the slow speed of the printer. Purchasing a black and white laser printer, such as this Brother HL-2270DW, will result in a lower cost-per-sheet, plus it will print faster. If you decide that using print areas is a better option for you, then make sure you also know how to clear a print area in Excel 2010 as well. After receiving his Bachelor’s and Master’s degrees in Computer Science he spent several years working in IT management for small businesses. However, he now works full time writing content online and creating websites. His main writing topics include iPhones, Microsoft Office, Google Apps, Android, and Photoshop, but he has also written about many other tech topics as well. Read his full bio here.
You may opt out at any time. Read our Privacy Policy


