The Type tool in Photoshop CS5 has an associated panel called the Character panel and includes a number of additional type settings that can help you to customize your text layers. But if you need to access the Character panel and do not see it on your screen, then it may be hidden from view. Fortunately, there are two different ways to show the Character panel in Photoshop CS5, and you can use either of these methods to gain access to the settings that it contains.
How to Show the Character Panel in Adobe Photoshop
Our guide continues below with more information on showing the Adobe character panel, including pictures of these steps.
How to Display the Character Panel in Photoshop CS5 (Guide with Pictures)
We will show you two methods below that can be used to display the Character panel in Adobe Photoshop CS5. Both options will lead to the same results, so you can use whichever method you prefer.
Method 1 – Window tab
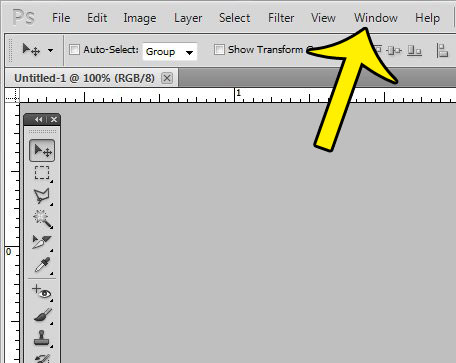
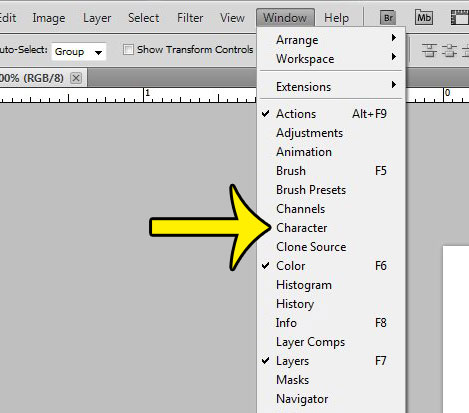
Step 1: Click the Window tab at the top of Photoshop CS5. Step 2: Click the Character option.
Method 2 – Type tool
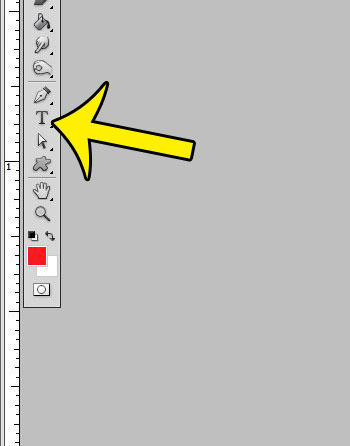
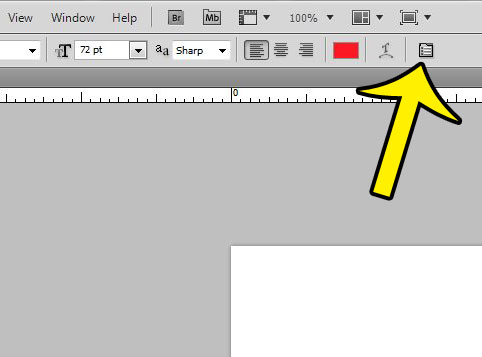
Step 1: Click the Type tool in the Photoshop toolbox. Step 2: Click the Toggle the Character and Paragraph Panels button in the Type toolbar at the top of the window. With your character panel now displayed in the Photoshop window you can make many assorted changes to your selected text, including underlining, character spacing, and more.
How Do I Change the Font Style from the Character and Paragraph Panels in Photoshop?
Once you have the character panel visible you may be wondering how to use it. As you start typing on a text layer, which you can select by clicking the Horizontal Type Tool in the toolbox, then the letters will use the character and paragraph options that are defined within the parameters of the character panel. For example, you can see the font name that is being used by looking at the dropdown menu. If you type the first few letters and you don’t like the type styles that are currently applied, then you can select a single character or the entire typed layer, then make adjustments to things like the color range or horizontal scale and see if that improves the look of the text that you are typing. There are a lot of type options that you can feel free to experiment with, some of which are less commonly found in other editing tools. While you can change the point size in most applications, for example, there’s a good chance that you may not be familiar with changing the font’s baseline, or adding more space between two characters as you type. You can really warp text characteristics pretty significantly with the Photoshop character tools. If you find that you have made too many changes to the text panel then you might need to start over. If you click the flyout menu in the Character panel (the one with three horizontal lines) then you can click the Reset Character button to restore the panel to its default settings.
More Information on the Photoshop Character Panel
While many of the changes that you will need to make to text that you have added to a Photoshop image can be performed with the character panel, you might need to make some other changes as well. When you select a text layer from the Layers panel you can select text on that layer and use the Character panel to apply changes to it. However, you can also use options in the toolbar at the top of the window to make changes to the text selection as well. For example, you will see options to change the text color, the text size, the font style, and more. Some of the options that are available in the Photoshop Character panel are:
FontFont styleFont sizeFont leadingKerningTrackingVertical scalingHorizontal scalingBaseline shiftFont color
There is also a horizontal row of font effects at the bottom of this panel that includes options for:
Faux boldFaux italicAll capsSmall capsSuperscriptSubscriptUnderlineStrikethrough
You may have noticed that there is also a Character Styles panel listed when you open the Windows options bar. A character style in Adobe Photoshop is a set of formatting selections that you can save, and then quickly apply to a text layer in your image. For example, if you are working on a file and you have a combination of default settings that you need to apply to the text that you add, such as some of the faux styles or other specific style that you might need, then saving a character style and applying it later can be much faster than other solutions. Photoshop’s character panel is a useful way to format individual letters or selected characters within a photoshop text layer, but you can still make adjustments to one or more characters in a type layer with the menu bar then appears at the top of the window when you have the Type tool selected. It can be difficult to select individual characters or even select characters at all when you are working with a small layer of text. If so, then it’s helpful to know how to find the Zoom option from the Edit menu. Or you can try and commit the zoom keyboard shortcut to memory, which is Ctrl + +. If you are sending a Photoshop file to someone else but they are having problems seeing your text, then it may be due to a font issue. One way to ensure that your text always displays on other computers as intended is to rasterize your text layers. This effectively turns any text layers in your Photoshop file into image layers, and is a useful thing to know if you create files that are used by others for printing or online work.
Additional Reading
He specializes in writing content about iPhones, Android devices, Microsoft Office, and many other popular applications and devices. Read his full bio here.


